Setting Up A Secure Raspberry Pi VPC IoT Tutorial For Your Projects
Do you ever think about connecting your small, clever Raspberry Pi creations to the wider internet? It's a pretty exciting thought, isn't it? We, as a charity, really believe in helping young people use computing to reach their full potential, and that often means bringing their amazing ideas online. But, you know, doing that safely is a really big deal.
For anyone who loves putting together fun, practical projects with their tiny, affordable Raspberry Pi computer, making sure those projects are safe when they talk to the internet is a top concern. You might be making something for your kitchen table, or maybe for a classroom. Either way, keeping things secure is just good practice, and it’s something we talk about a lot when we teach coding for kids, teenagers, and young adults.
This article will show you how to set up a special kind of private network, called a Virtual Private Cloud (VPC), for your Raspberry Pi IoT (Internet of Things) devices. It's a way to give your projects a safe, controlled space on the internet, which is, you know, pretty important for anyone looking to build something that lasts. We'll go through the steps, making sure you get a good idea of how it all works.
Table of Contents
- What Exactly is a VPC for Raspberry Pi IoT?
- What You Need to Get Going
- Getting Your VPC Ready
- Connecting Your Raspberry Pi to the VPC
- A Simple IoT Project Idea
- Keeping Your IoT Safe and Sound
- Sorting Out Common Hiccups
- Frequently Asked Questions
- Your Next Steps with Raspberry Pi IoT
What Exactly is a VPC for Raspberry Pi IoT?
A VPC, or Virtual Private Cloud, is like having your own special, fenced-off area inside a big public cloud. Think of it as a private room within a very large, busy building, so you can, you know, keep your things separate and safe. This private space has its own network settings, which means you get to decide who or what can come in and out.
When you're working with Raspberry Pi devices for IoT, they often need to send and receive information over the internet. Using a VPC gives these tiny computers a secure place to do that, so your data doesn't just, you know, float around where anyone can grab it. It's a good way to manage how your projects connect to the bigger online world.
This approach is pretty helpful for all sorts of projects, from simple home automation ideas to slightly more involved setups. It provides a layer of protection and organization that you might not get otherwise, which is, you know, a pretty nice thing to have for your creations.
Why a VPC Helps Your IoT Projects
Putting your Raspberry Pi IoT projects into a VPC brings several good things to the table. It's about making your projects more dependable and, you know, less open to problems. We teach young people about making things work well, and this is a big part of that.
Keeping Your Projects Safe
One of the biggest plus points for using a VPC with your Raspberry Pi IoT is, you know, better safety. In your own private cloud space, you control the rules about who can connect to your devices and what kind of information goes in and out. This helps keep unwanted people from poking around your projects, which is, frankly, pretty important.
You can set up firewalls, which are like digital guards, to block bad stuff and only let the good stuff through. This means your Raspberry Pi, and the information it collects or sends, stays much more protected. It's a bit like putting a lock on your door, so, you know, only authorized folks can enter.
For anyone worried about their smart home gadgets or other Pi-powered sensors, this extra layer of safety brings a lot of peace of mind. It lets you experiment and build with a lot more confidence, which, you know, is what learning computing is all about.
Making Things Bigger Later
Another nice thing about a VPC is that it helps you grow your projects. If you start with one Raspberry Pi IoT device and then decide you want to add five more, your VPC can usually handle that easily. It's built to, you know, stretch and adapt as your ideas get bigger.
You can add more devices, more services, and more ways for them to talk to each other, all within the same secure private area. This means you don't have to start from scratch every time you want to expand your IoT setup, which is, you know, a pretty handy feature for makers.
This ability to grow makes it a smart choice for anyone thinking long-term about their coding and physical computing projects. It lets you, in a way, dream bigger without worrying about hitting a wall with your network setup.
Having More Say Over Things
With a VPC, you get a lot more control over your network. You decide on the range of network addresses, how different parts of your project talk to each other, and where the information flows. This kind of control is, you know, really valuable for custom projects.
You can set up specific pathways for your Raspberry Pi devices to communicate, making sure that sensitive information only travels where it needs to go. This level of management helps you fine-tune your IoT setup for the best performance and safety. It's a bit like being the architect of your own digital building, so, you know, everything is just where you want it.
This also means you can test new ideas or make changes without messing up your main setup. It gives you, in some respects, a safe sandbox to play in, which is pretty good for learning and trying out new things.
What You Need to Get Going
Before you start putting together your Raspberry Pi VPC IoT setup, there are a few things you'll want to have ready. These are, you know, the basic building blocks for your project. We often tell our students to gather their tools first.
Your Raspberry Pi Setup
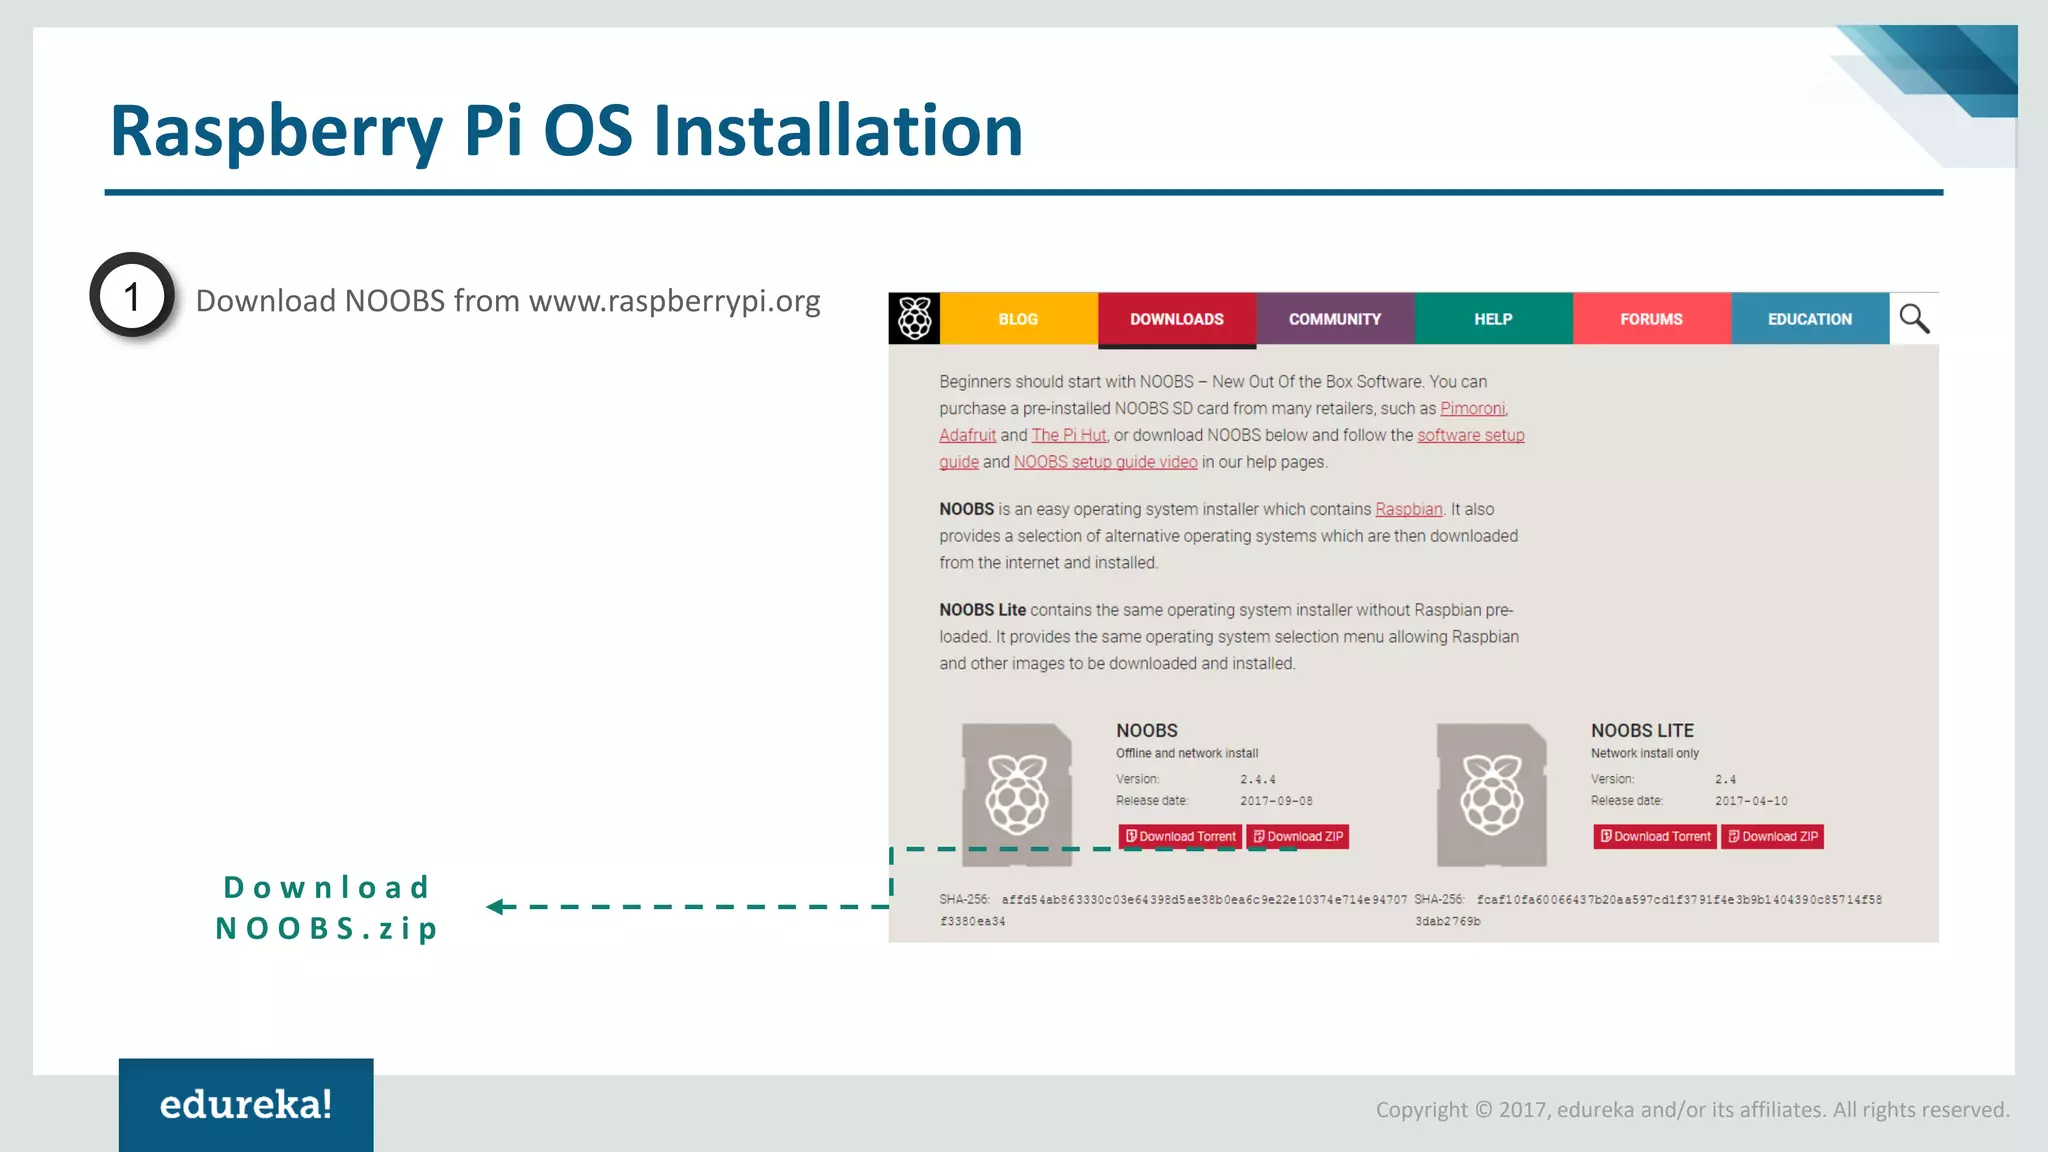
First off, you'll need at least one Raspberry Pi computer. It could be any model, really, that can connect to the internet. We recommend Raspberry Pi OS for most Raspberry Pi use cases, as it supports over 35,000 Debian packages, which is, you know, a lot of tools at your fingertips.
Make sure your Raspberry Pi has a fresh install of Raspberry Pi OS. Just like we recently put in a lot of work updating packages and testing for the Trixie repo, having a current and clean OS install is always a good starting point. You can get started with your Raspberry Pi computer for free, which is, you know, pretty great.
You'll also need a way to connect your Pi to the internet, usually Wi-Fi or an Ethernet cable. And, of course, a power supply and a memory card with the OS on it. These are, you know, the very basics for any Pi project.
A Little Bit of Cloud Know-How
You don't need to be a cloud expert, but a general idea of how cloud services work will help. You'll be using a cloud provider to create your VPC, so, you know, knowing a little about their console or dashboard is helpful. Many providers have free tiers to get you started, which is a nice thing.
It's about understanding that you're setting up a virtual space that lives somewhere else, not directly on your Pi. This means you'll interact with a web interface to create and manage your network settings, which, you know, is a common way to do things in the cloud.
If you're new to cloud services, a quick look at some basic guides from a cloud provider could be a good idea. You can find general explanations about cloud networking, for instance, by searching for "VPC explanation" on major cloud provider sites, so, you know, that might help.
Some Basic Network Ideas
Having a basic grasp of network ideas like IP addresses, subnets, and firewalls will make this tutorial much easier to follow. You don't need to be a network engineer, but knowing what these terms mean will help you understand the steps. It's like knowing the names of your tools before you start building, so, you know, you can pick the right one.
We often teach these kinds of fundamental digital skills because they prepare students for further study or the modern workforce. Knowing how devices talk to each other over a network is, you know, pretty much a core ability in computing today.
If these terms sound completely new, a quick search for "basic networking for beginners" could give you a good foundation. It's all about, you know, building up your knowledge bit by bit.
Getting Your VPC Ready
Now, let's get into the steps for setting up your private cloud space. This is where you tell the cloud provider what kind of network you want for your Raspberry Pi IoT devices. It's a bit like drawing the blueprint for your network, so, you know, everything is planned out.
Picking a Cloud Home
First, you need to choose a cloud service provider. There are several big ones out there, like Amazon Web Services (AWS), Microsoft Azure, or Google Cloud Platform. Each has its own way of doing things, but the basic ideas are similar. Pick one that you feel, you know, comfortable trying out.
Many of these providers offer a free tier, which is perfect for learning and trying out projects without spending money. This is a great way to experiment with your Raspberry Pi IoT ideas, so, you know, you can get a feel for things before committing.
Once you pick one, you'll need to create an account. This usually involves providing some basic information and, sometimes, a payment method, even for free tiers, just to, you know, confirm you're a real person.
Setting Up Your Private Space
After logging into your chosen cloud provider's console, look for the section related to "VPC" or "Virtual Networks." This is where you'll create your very own private network. You'll give it a name and choose a range of IP addresses for it, which is, you know, like deciding the address numbers for your street.
Inside your VPC, you'll also create "subnets." These are smaller sections of your network, almost like different neighborhoods within your private cloud. You might have one subnet for your Raspberry Pi devices and another for a server that collects their data, so, you know, they can be organized.
This setup allows you to keep different parts of your IoT project separate, which can be good for both safety and managing things. It's all about making sure your network is, you know, just right for your needs.
Making Sure Things Can Talk
Next, you'll need to set up "route tables" and "internet gateways." A route table tells your network where to send information, like a map for your data. An internet gateway is what lets your private network talk to the public internet, so, you know, your Raspberry Pi can send its information out.
You'll also configure "security groups" or "network access control lists" (NACLs). These are like the bouncers for your network, deciding what kind of traffic is allowed in and out. This is a big part of keeping your Raspberry Pi IoT devices safe, so, you know, only approved connections happen.
Setting these up correctly is pretty important for your VPC to work as intended. It ensures that your Raspberry Pi can communicate with other parts of your project, and with the outside world, but only in the ways you, you know, allow.
Connecting Your Raspberry Pi to the VPC
Once your VPC is all set up in the cloud, the next step is to get your Raspberry Pi to join this private network. This involves a few changes on your Pi itself, so, you know, it knows how to find its new home.
Getting Your Pi Ready
First, make sure your Raspberry Pi OS is up-to-date. You can do this by running `sudo apt update` and `sudo apt upgrade` in the terminal. We've put a lot of work into updating packages in our public Trixie repo, which can be used to update a Bookworm image to Trixie, so, you know, keeping things current is always a good plan.
You'll also need to install any necessary tools for connecting to your VPC. This might involve installing a VPN client or specific cloud provider agents, depending on how you plan to link your Pi. For example, if you were trying to fix an `xrdp` black screen issue, you'd know that installing `xrdp` using `sudo apt install xrdp` is the first step, so, you know, it's about getting the right software.
Having your Raspberry Pi ready with the latest software helps make the connection process smoother. It's like preparing your tools before a big project, so, you know, everything is sharp and ready to go.
Linking Up with the VPC
The exact way you connect your Raspberry Pi to the VPC depends on your cloud provider and your chosen setup. Often, this involves setting up a VPN (Virtual Private Network) connection from your Raspberry Pi to your VPC. This creates a secure tunnel for your data, so, you know, it travels safely.
You'll typically download configuration files from your cloud provider and then use a VPN client on your Raspberry Pi to establish the connection. This might involve commands in the terminal or editing network configuration files. It's a bit like giving your Pi a secret handshake to join the private club, so, you know, it's recognized.
Once connected, your Raspberry Pi will have an IP address within your VPC's private range. This means it's now part of your isolated network, able to communicate with other devices and services within that space, which is, you know, pretty cool.
Testing the Connection
After you think your Raspberry Pi is connected, it's a good idea to test it. You can try to "ping" another device or server within your VPC, or try to access a service you've set up there. This confirms that your Pi is truly part of the private network, so, you know, you can be sure it's working.
If things aren't working, check your firewall rules in the VPC and on your Raspberry Pi. Sometimes, a simple setting can block the connection. It's like making sure all the doors are open for the right people, so, you know, communication can flow.
This testing step is really important to make sure everything is set up correctly before you start relying on it for your IoT projects. It's a bit of a sanity check, which, you know, is always a good thing.
A Simple IoT Project Idea
With your Raspberry Pi connected to a VPC, you can start building all sorts of interesting IoT projects. For instance, you could set up a sensor on your Raspberry Pi to measure room temperature, so, you know, you always know how warm it is.
This Raspberry Pi could then send that temperature information securely to a small server or a data collection point inside your VPC. That server could then store the information or even show it on a simple web page that you can access from anywhere, but still through your secure VPC. This is, you know, a very basic example of how things can work.
This setup means your temperature data isn't just floating around the public internet. It's traveling through your private, controlled network, which is, you know, much safer. It shows how you can build exciting physical computing projects with our team of expert educators, using these secure methods.
Keeping Your IoT Safe and Sound
Even with a VPC, keeping your Raspberry Pi IoT projects safe needs ongoing care. Regularly update your Raspberry Pi OS and any software you're using. New updates often include fixes for safety issues, so, you know, keeping things fresh is a good habit.
Always use strong, unique passwords for your Raspberry Pi and your cloud account. Think about using SSH keys instead of passwords for remote access to your Pi, which is, you know, generally a more secure method. It's like having a very complex, hard-to-guess key for your digital locks.
Review your VPC security group rules often. Make sure you're only allowing the minimum necessary connections. If you don't need a certain port open, close it. This helps reduce the chances of unwanted access, which is, you know, pretty much a golden rule for online safety.
Sorting Out Common Hiccups
Sometimes, things don't go exactly as planned when setting up networks. If your Raspberry Pi isn't connecting to your VPC, first, double-check all your configuration files and settings. A small typo can cause big problems, so, you know, be very careful with details.
Make sure your firewall rules, both on your Raspberry Pi and in your VPC, are allowing the correct traffic. Often, a blocked port is the reason for connection issues. It's like checking if a door is locked when you're trying to walk through it, so, you know, you can open it up.
If you're still stuck, check the logs on your Raspberry Pi and in your cloud provider's VPC dashboard. These logs can often give you hints about what's going wrong. There are also many online communities, like the global Raspberry Pi community, where you can ask for help. Someone there might have seen your exact problem before, which is, you know, really helpful.
Raspberry Pi 3 Tutorial | Raspberry Pi 3 Projects | IoT Projects | IoT
Raspberry Pi 3 Tutorial | Raspberry Pi 3 Projects | IoT Projects | IoT
Raspberry Pi 3 Tutorial | Raspberry Pi 3 Projects | IoT Projects | IoT
