Secure **remoteiot Ssh Aws Example**: Connecting Your Devices With Confidence
Connecting with devices out in the field, far from your direct reach, has always been a significant puzzle for anyone working with the Internet of Things. You see, these little gadgets, whether they are sensors, actuators, or small computers, often need a check-up, a quick fix, or a software update. Getting to them physically isn't always an option, so having a way to talk to them from afar is absolutely essential. This is where the idea of remote access comes into play, and it's something many folks in the IoT space think about a lot, as a matter of fact.
For a long time, Secure Shell, or SSH, has been the trusted friend for securely logging into computers over networks. It offers a strong, encrypted tunnel, keeping your commands and data safe from prying eyes. It's a bit like having a secret handshake and a private conversation channel, which is pretty important when you are dealing with sensitive operations on distant machines, you know.
When you bring AWS, or Amazon Web Services, into the picture, things get even more interesting. AWS provides a whole suite of tools that can help you manage these connections, making sure they are not just secure but also scalable and easy to handle, even if you have hundreds or thousands of devices. Just as we see the importance of securely handling and accessing information in many digital spaces, from the way we manage online content to how we analyze large sets of data for important reports, having a solid, dependable way to connect with your remote IoT devices is pretty much vital. This guide will walk you through setting up a practical **remoteiot ssh aws example**, showing you how to achieve secure, efficient remote access.
Table of Contents
- The Heart of Remote Device Management
- Why SSH for IoT Devices?
- AWS IoT Core as Your Secure Gateway
- Setting Up Your remoteiot ssh aws example
- Benefits of This Approach
- Overcoming Common Challenges
- Future Directions for Remote IoT Access
- Frequently Asked Questions
- Bringing It All Together
The Heart of Remote Device Management
When you're dealing with a network of IoT devices, they are very often placed in locations that are hard to get to. Think about sensors in a remote agricultural field, smart meters in people's homes, or even industrial machinery on a factory floor. These devices are meant to run on their own, but things can, and sometimes do, go wrong. So, you might need to troubleshoot an issue, or perhaps send a software update to patch a security vulnerability, you know.
Without a good remote access strategy, every little problem could mean sending a technician out, which costs a lot of time and money. It's not just about fixing things when they break, either. You might also want to collect specific data on demand, or change a setting that affects how the device behaves. This kind of interaction is pretty much at the core of making IoT solutions truly useful and manageable in the long run, and it's something that needs to be thought through carefully.
Having a solid remote access plan also helps with the lifecycle of your devices. From their initial deployment to ongoing maintenance and eventual retirement, the ability to connect with them from anywhere means you can keep them running smoothly and efficiently. It really does make a big difference in how you operate your IoT fleet, you see, and it simplifies many tasks that would otherwise be quite complicated.
Why SSH for IoT Devices?
SSH stands out as a preferred method for remote access because of its strong security features. When you connect via SSH, all communication between your computer and the remote device is encrypted. This means that any data you send or receive, including your login credentials, is scrambled, making it incredibly difficult for unauthorized parties to intercept and understand. This protection is, quite frankly, vital for IoT devices that might be in less secure environments, or that handle sensitive information, so.
Beyond encryption, SSH offers robust authentication methods. You can use passwords, but more securely, you can rely on SSH keys. This involves a pair of cryptographic keys: a public key that resides on the IoT device and a private key that stays on your local machine. When you try to connect, the device challenges your private key, and if it matches the public key, access is granted. This key-based authentication is much safer than passwords, which can be guessed or stolen, and it's a practice many people trust for high-security access, too it's almost.
Another benefit is SSH's ability to create secure tunnels. This means you can forward network traffic through the SSH connection, allowing you to access other services running on your IoT device or even on other devices within the same network segment, all while keeping that traffic encrypted. This versatility is pretty handy for various troubleshooting and management tasks, giving you a lot of flexibility in how you interact with your remote hardware. It's a very flexible tool, that.
For IoT, where devices might have limited resources, SSH is also relatively lightweight. It doesn't demand a huge amount of processing power or memory, which is a big plus for small, embedded systems. This efficiency means you can implement secure remote access without bogging down your devices, ensuring they can still perform their primary functions effectively. It's a practical choice for many reasons, really.
AWS IoT Core as Your Secure Gateway
AWS IoT Core is the central service that lets your IoT devices connect to AWS cloud services and to each other. It acts as a kind of message broker, handling billions of messages from millions of devices. For our SSH example, AWS IoT Core doesn't directly provide SSH, but it sets the stage for a secure and managed connection. It's the foundation upon which we build our secure remote access solution, that is.
One of the key features of AWS IoT Core is its robust security model. Devices authenticate using X.509 certificates and AWS IAM policies, ensuring that only authorized devices can connect and only perform actions they are allowed to. This strong identity management is absolutely critical for keeping your IoT fleet safe from unauthorized access, which is something you definitely want to avoid. It helps manage who or what can talk to your devices, and how, in a very controlled way.
AWS IoT Core also offers device shadows, which are persistent, virtual versions of your devices in the cloud. You can use device shadows to store and retrieve the current state of a device, even when the device is offline. While not directly for SSH, this capability helps in managing devices remotely, letting you know their status before you even try to connect. It's a bit like having a consistent record of your device's last known condition, which is pretty useful for operations, you know.
For facilitating SSH, AWS IoT Core works hand-in-hand with other AWS services, particularly AWS Systems Manager (SSM) Session Manager. This combination allows you to establish a secure tunnel to your IoT devices without opening inbound ports on the device or managing SSH keys directly on each one. This approach is much safer and more scalable than traditional methods, and it's a very modern way to handle remote connections, too it's almost.
Setting Up Your remoteiot ssh aws example
Setting up secure SSH access to your IoT devices through AWS involves a few steps, but once it's configured, it provides a very reliable and safe way to manage your fleet. We will focus on using AWS Systems Manager (SSM) Session Manager as a proxy, which is a recommended practice for its security and ease of use. It makes the whole process much smoother, you see.
Prerequisites: Getting Ready
Before you begin, you will need a few things in place. First off, an active AWS account is pretty much essential. You will also want to have a basic understanding of Linux command-line operations, as most IoT devices run on some form of Linux. For your IoT device, a Raspberry Pi or a similar single-board computer is a great choice for this example, as it's easy to work with and widely available. Make sure it has an operating system installed and SSH enabled on it, that.
You will also need an SSH client on your local machine, which is usually pre-installed on Linux and macOS. For Windows, you might use PuTTY or the built-in OpenSSH client in newer versions. Lastly, you'll need the AWS CLI (Command Line Interface) installed and configured on your local machine, and the Session Manager plugin for the AWS CLI. These tools help you interact with AWS services directly from your terminal, which is very convenient for managing things, you know.
Having these ready saves a lot of time and makes the setup process much smoother. It's a bit like gathering all your ingredients before you start cooking; everything just flows better when you're prepared. So, take a moment to get these prerequisites sorted out, and you'll be in a good spot to move forward, really.
Step-by-Step: Configuring AWS IoT
First, you need to register your IoT device as a "Thing" in AWS IoT Core. Go to the AWS IoT console, choose "Manage," then "Things," and create a new thing. Give it a descriptive name. This step creates a digital representation of your physical device in the AWS cloud, which is pretty important for tracking it, you know.
Next, you will create a security policy that allows your device to connect to AWS IoT Core and to interact with AWS Systems Manager. This policy will grant permissions for actions like publishing messages, subscribing to topics, and updating its device shadow. It's a bit like giving your device a set of rules for what it can and cannot do in the cloud. You attach this policy to a certificate, which your device will use for authentication, that is.
After creating the policy, you generate a certificate and key pair for your device within the AWS IoT console. Download these certificate files, along with the root CA certificate from Amazon. These files are absolutely critical for your device to securely authenticate with AWS IoT Core. Without them, your device won't be able to talk to the cloud, so make sure you keep them safe, too it's almost.
Finally, attach the policy you created to the certificate, and then attach the certificate to your IoT Thing. This links everything together, giving your device the necessary permissions to operate within AWS IoT. This careful setup of identities and permissions is what makes the whole system secure, which is something you definitely want for your IoT fleet, really.
Device-Side Setup
Now, let's get your IoT device ready. You need to copy the certificate, private key, and Amazon root CA certificate files you downloaded from AWS IoT Core onto your device. A secure way to do this is using SCP (Secure Copy Protocol) if you have initial SSH access, or by directly loading them onto the device's storage. These files will be used by the AWS IoT Device SDK to establish a secure connection to AWS IoT Core, you see.
Install the AWS IoT Device SDK for Python or Node.js, depending on your device's capabilities and your preferred language. This SDK handles the complex details of connecting to AWS IoT Core using MQTT (Message Queuing Telemetry Transport) and managing certificates. It makes it much easier for your device to communicate with the cloud, which is a big help, that.
You also need to ensure that the SSH server (sshd) is running on your IoT device. For most Linux-based systems, this is usually enabled by default or can be easily started. Make sure your SSH server is configured to allow key-based authentication and that you have a public SSH key for the user you intend to log in as on the device. This is pretty much standard practice for secure SSH access, you know.
Crucially, for the SSM Session Manager approach, your device needs to run the SSM Agent. This agent allows AWS Systems Manager to manage your device, including establishing SSH tunnels. Install the SSM Agent on your IoT device and configure it to connect to AWS. This agent acts as the bridge between your device and the SSM service, making the whole remote management possible, and it's a very important piece of the puzzle, really.
Initiating the SSH Connection
With everything configured, you can now initiate the SSH connection from your local machine through AWS Systems Manager. You'll use the AWS CLI with the Session Manager plugin. The command typically looks something like `aws ssm start-session --target
When you run this command, AWS Systems Manager establishes a secure tunnel to your IoT device via the SSM Agent running on it. This tunnel then allows your local SSH client to connect directly to the SSH server on your device. It's a bit like having a private, secure pathway directly to your device, bypassing the need for public IP addresses or open inbound ports, which is a huge security advantage, you know.
Once the session starts, you'll be prompted for your SSH credentials, typically your private key. After successful authentication, you'll have a standard SSH shell session to your remote IoT device. From there, you can run commands, transfer files, and perform any administrative tasks just as if you were sitting right in front of the device. This seamless experience is what makes this setup so powerful and convenient, and it's something many people find very useful, too it's almost.
This method means you don't need to expose your device to the public internet, which is a significant security improvement. All traffic flows securely through AWS Systems Manager, which handles the network routing and authentication. It's a very elegant solution for secure remote access, and it's something that really helps keep your IoT deployment safe and sound, really.
Benefits of This Approach
Using AWS IoT Core and Systems Manager for your **remoteiot ssh aws example** offers a bundle of advantages. For one, security is dramatically enhanced. By leveraging AWS's strong authentication and authorization mechanisms, and by routing all traffic through SSM, you avoid exposing your devices directly to the public internet. This significantly reduces the attack surface, which is a very important consideration for any connected device, you know.
Scalability is another huge benefit. As your fleet of IoT devices grows from a few to hundreds or even thousands, managing individual SSH connections and keys can quickly become a nightmare. AWS services are designed for scale, allowing you to manage and connect to a large number of devices centrally and efficiently. This means you can add more devices without a huge increase in management overhead, which is pretty handy, that.
Centralized management and auditability are also key. All remote sessions are logged and can be audited through AWS CloudTrail, providing a clear record of who accessed which device and when. This level of oversight is invaluable for compliance and troubleshooting. It's a bit like having a complete history book of all interactions with your devices, which is very helpful for accountability, too it's almost.
Furthermore, this approach can be cost-effective. While there are AWS service charges, the operational savings from not having to send technicians for every minor issue, or from not having to implement complex custom remote access solutions, can be substantial. It streamlines operations and helps you keep your expenses in check, which is something every project aims for, really.
Overcoming Common Challenges
While setting up a **remoteiot ssh aws example** is pretty straightforward, you might run into a few common challenges. One frequent issue is connectivity problems. Your IoT device needs a stable internet connection to communicate with AWS IoT Core and the SSM Agent. If the connection is spotty or drops frequently, your remote session might be interrupted. Ensuring reliable network access for your devices is absolutely essential for consistent remote management, you know.
Another challenge can be policy misconfigurations. AWS IAM policies and IoT policies can be quite detailed, and if permissions are not set correctly, your device might not be able to connect or the SSM
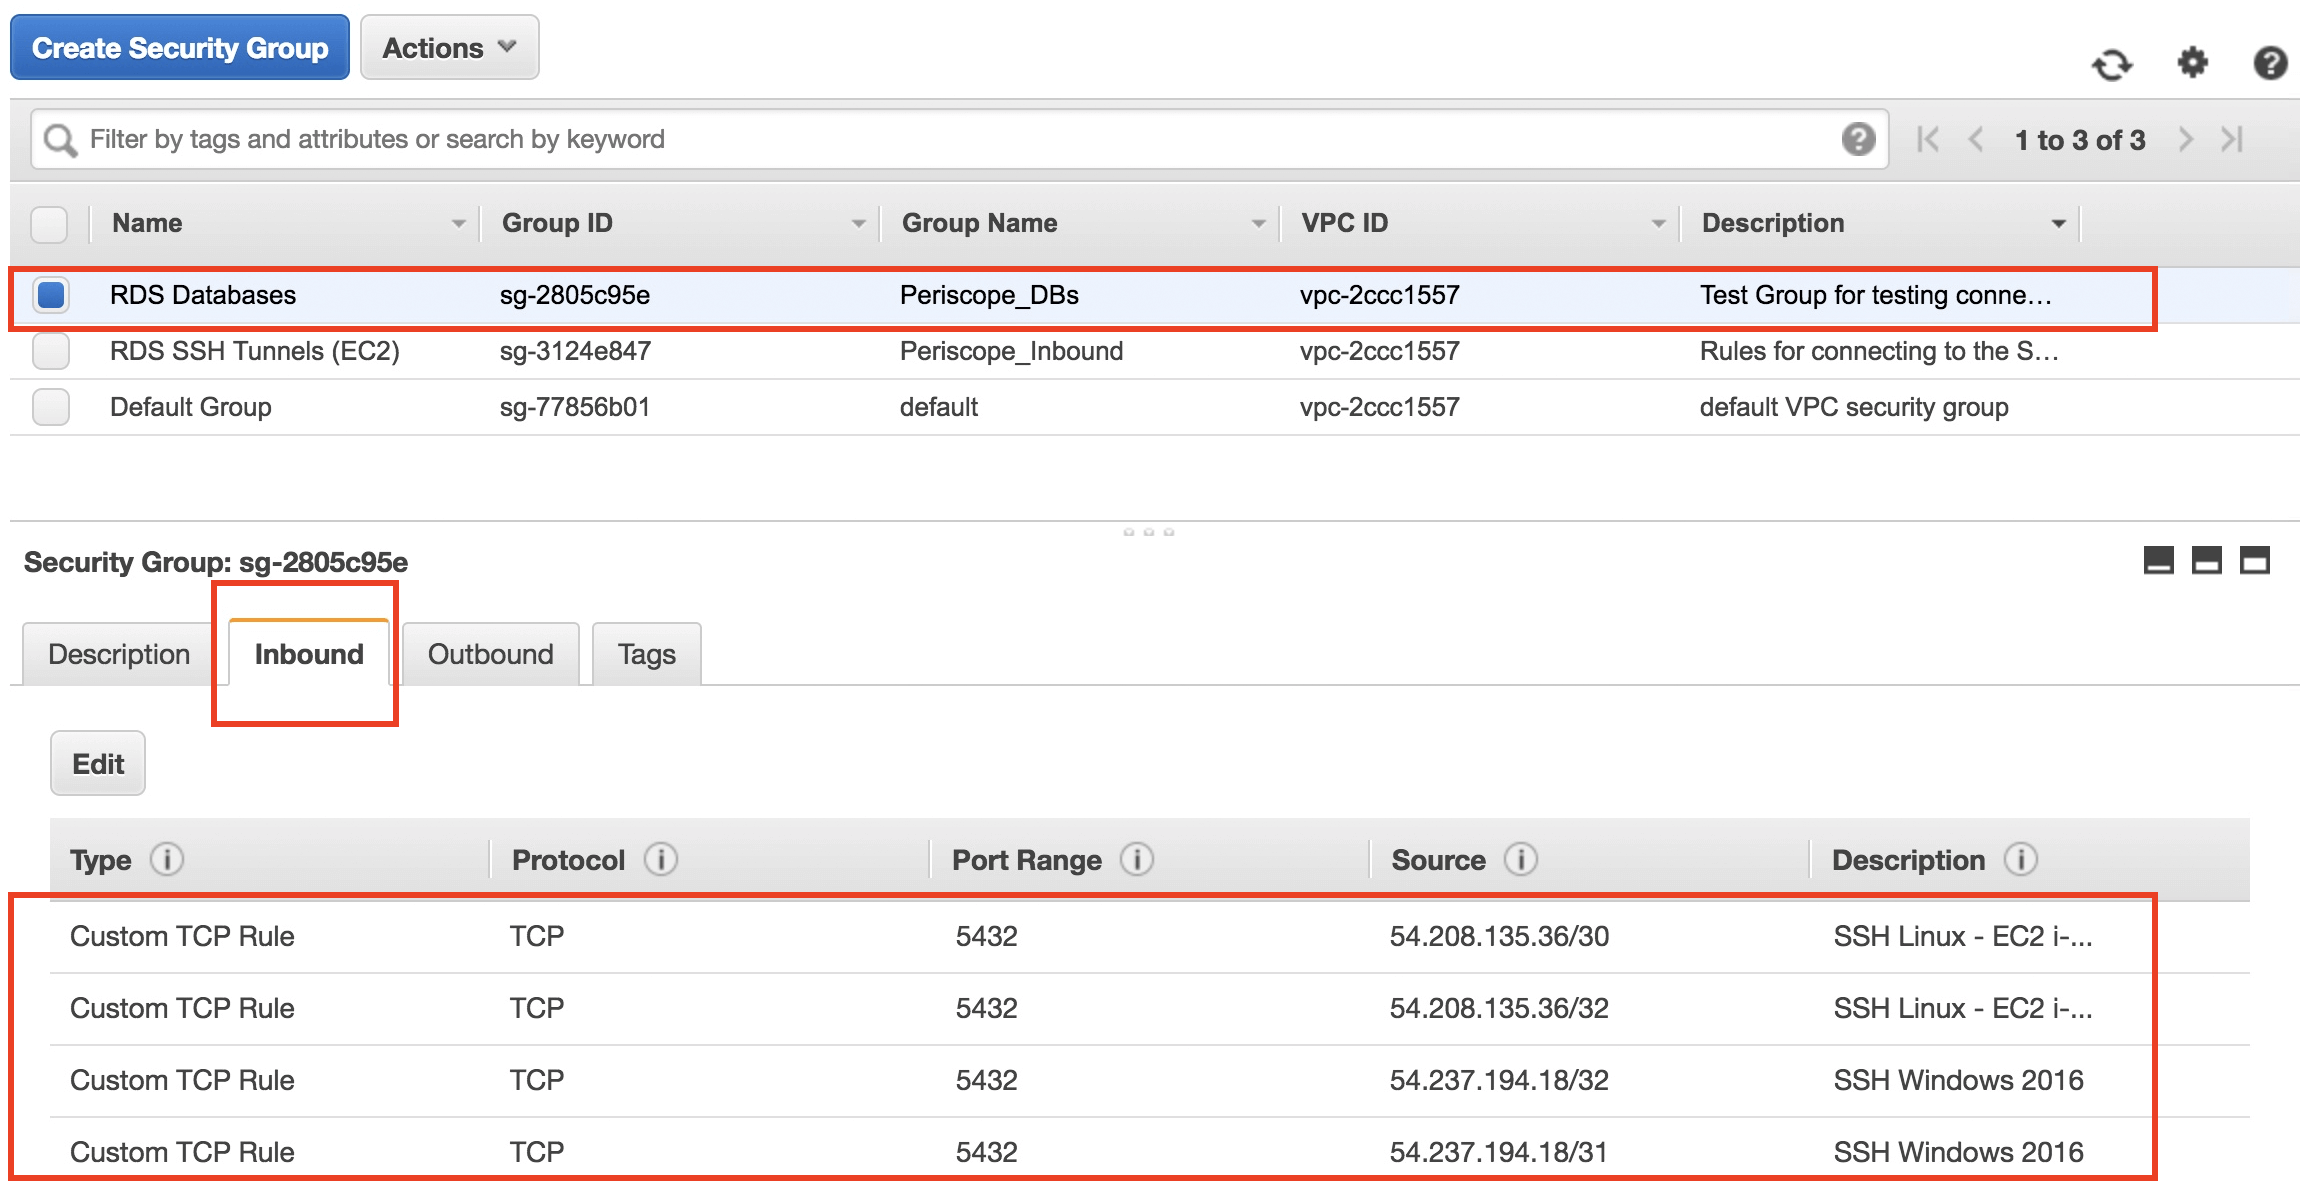
AWS SSH Security Group Configuration | Sisense for Cloud Data Teams
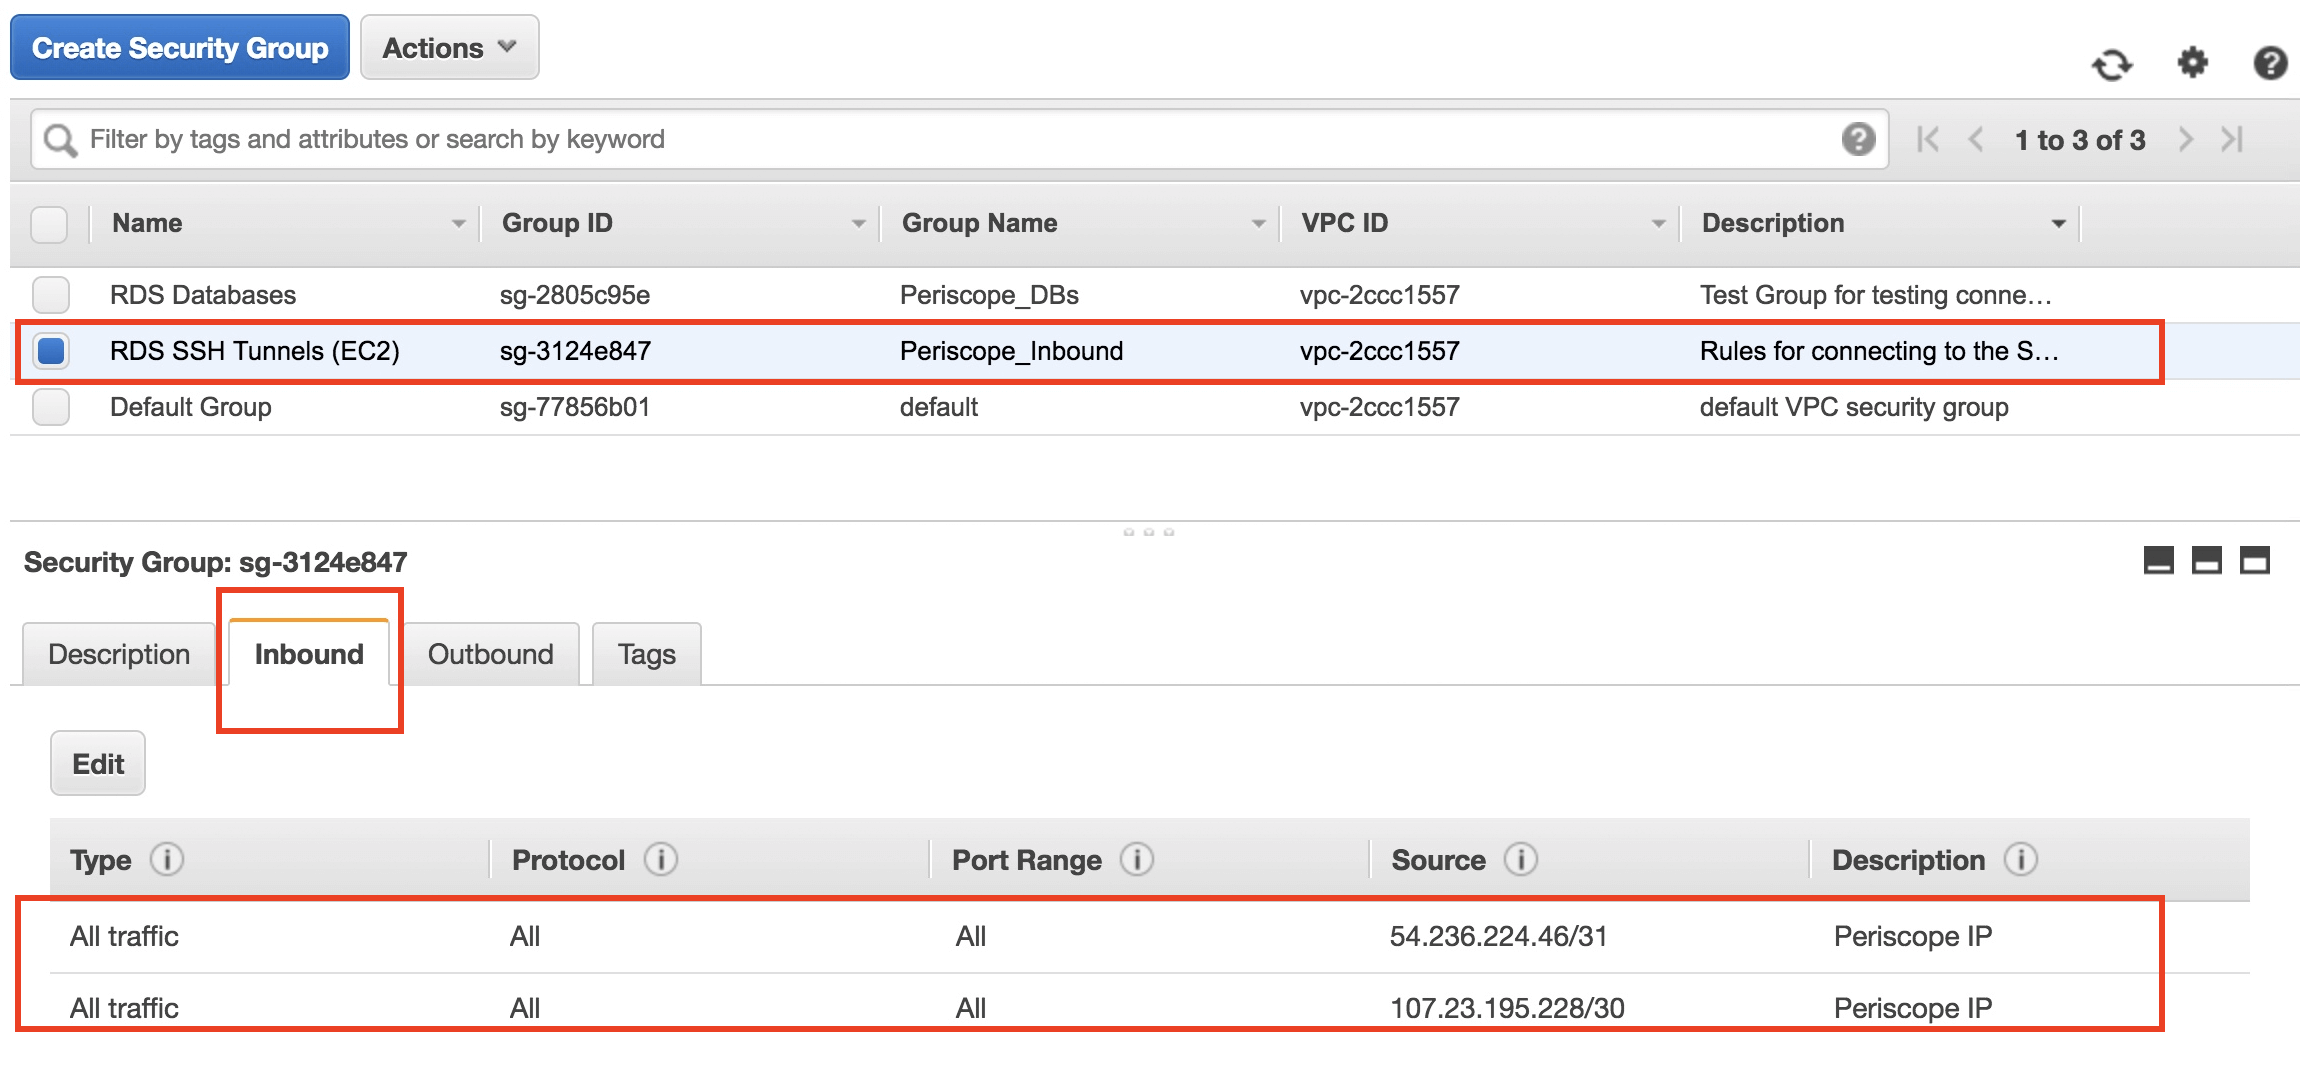
AWS SSH Security Group Configuration | Sisense for Cloud Data Teams
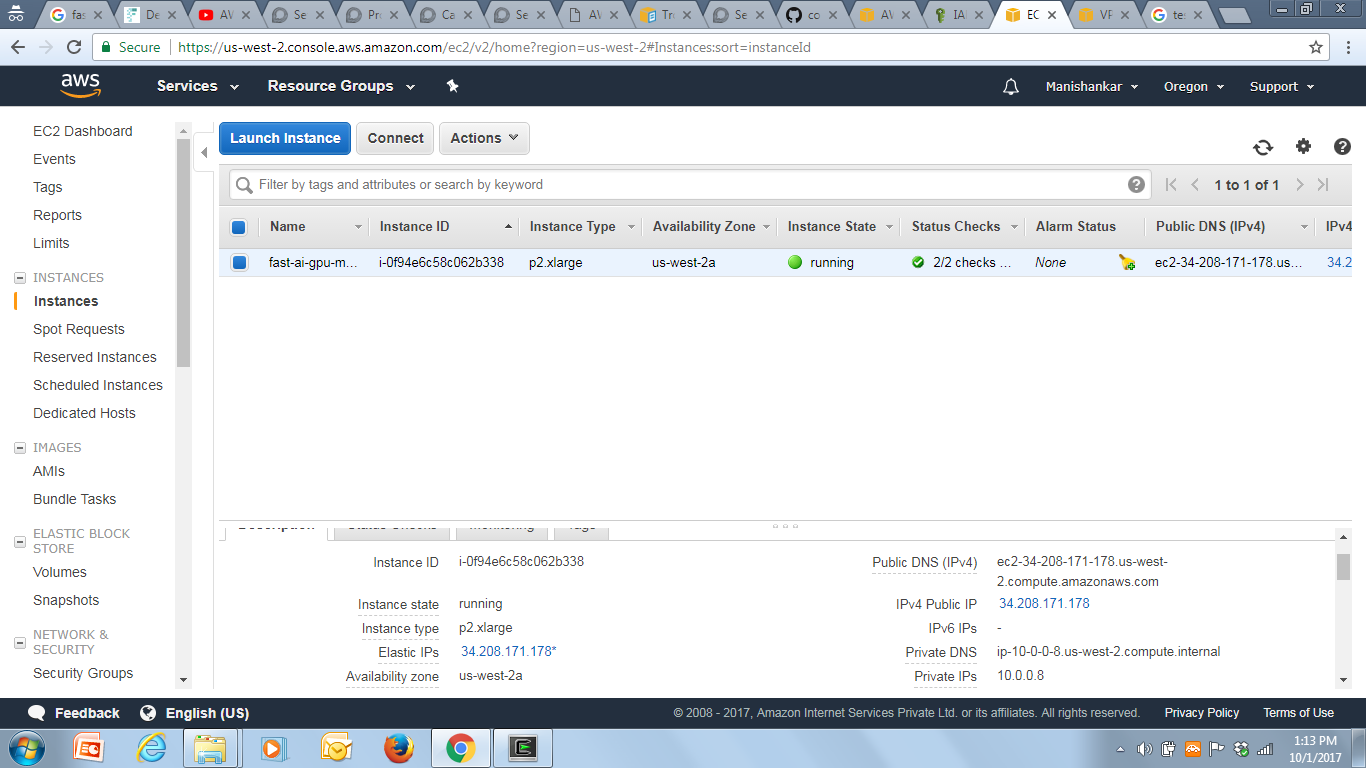
SSH into your AWS instance? - Part 1 (2017) - fast.ai Course Forums
